
1997 American Dream 2016 10 06
Click picture to see larger image
So my luck at repair shops has not been good at all.
I’m not mentioning this shop name because they appear to be trying to make it right.
It is currently back at that shop where they are trying to repair the turn signals in time for me to leave for the last points race of the season.
The repair began with a search for a slow air leak and snowballed into failure of my brake lights, turn signals and electric mirrors and window.
Let’s start sort of in the middle and work our way around.
I went to the shop to pick up the unit to leave for a race after the search for the slow air leak and discovered that my dash A/C was not working. After that race, the unit was returned to the shop. I was told that the A/C compressor was shot, the end bearing was destroyed, and the seal was leaking. When the system is opened, the dryer also needs to be replaced.
Gillig was called and the shop was told the compressor was no longer available but could be built from parts for $3,000. My comment was it looked like a standard GM compressor.
Gillig listed the part as a Tempcon Evens RV218336. After some research on my part, it turned out to be a standard GM A6 compressor available from Advance Auto with the clutch for $116.00. The dryer was a little more difficult, but I found it through Trucker A/C. I bought an O-ring set and new manifold for the rear of the compressor and dropped all the parts off.
I was called and told it was done; went to pick it up and had no A/C; did not even leave the parking lot.
They took it back and said that the low pressure sensor in the A/C system needed to be replaced.
I got it back again and had A/C.
So now I started to wonder about the A/C compressor and decided to investigate.
I believe what was seen “wobbling” was the clutch plate on the end of the compressor.
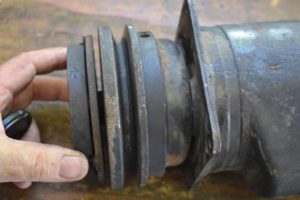
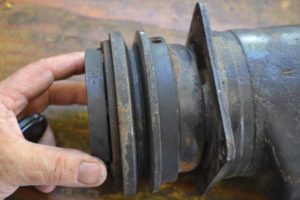
On the left side of the picture below, you see the clutch plate fully extended. In this position, the A/C compressor is now freewheeling. In the right picture below, the clutch plate is up against the pulley in the engaged position. This movement is normal and required for the correct operation of the compressor.
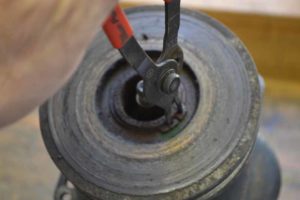
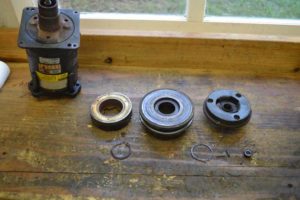
 The clutch is a repairable item and took me less the ten minutes to remove.
The end bolt is removed.
The clutch plate is lifted off with no special tools required.
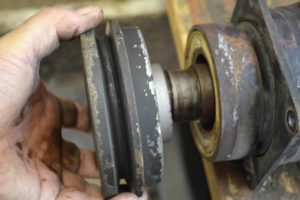
To remove the pulley that drives the compressor, a snap ring must be removed. Note there is no oil leakage here, just normal grime.
Removing the pulley with its bearing was a small struggle but not bad. Again note, no oil leakage.
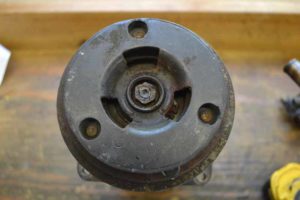
To remove the electro-magnet for the clutch, a second clip ring must be removed.
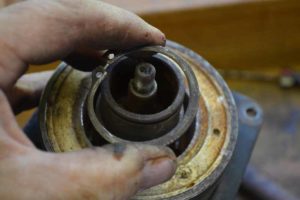
The magnet is a loose fit held in place by cogs.
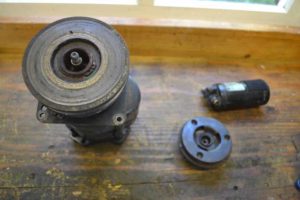
This whole operation took less than ten minutes and, if the clutch needed to be replaced, it could have been done on the motor home without removing the Freon in the system. I see no problems with the clutch; it was working as it should.
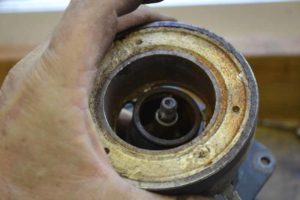
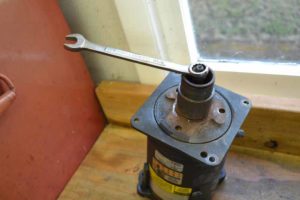 There is no end play in the shaft of the compressor and it rotates as it should. If rotated quickly. You can feel it compressing air. Again, no oil leakage.
I believe this was a misdiagnosis of the problem. I have make all of these parts available for inspection by the repair shop.
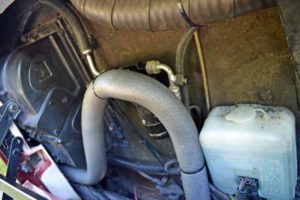
As part of the A/C compressor replacement, the dryer for the A/C system was replaced. When the new one was installed, oil from the system was sprayed all over under the hood. The dryer was installed into the original clamp but was not clamped in place and could be moved up and down freely. I noticed it immediately and showed both the service writer and mechanic that did the work before I left the shop. The mechanic’s response was if I wanted he could try and find something to shim the dryer up so that it would be clamped in place. If I left it like this, the road vibrations would eventually wear through either the clamp or the dryer.
So after the second trip back to the shop for a non-working A/C system, I had identified these issues: 1. Insulation coming off (no wire tie put back to keep it from peeling off), 2. Loose dryer in clamp, 3.Oil all over (note the oil running down the side of the dryer and on the case for the evaporator).
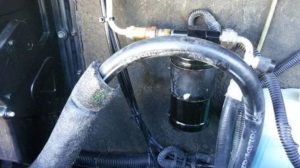

 I spent a little time cleaning up all the oil, purchased some new insulation and wire tied it into place.
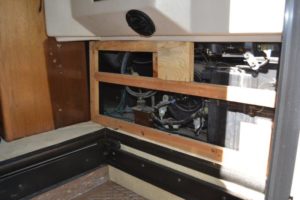
To get to the low pressure switch for the A/C system the entrance handle and backer board had to be removed. I had actually removed it prior to this trying to find the problem with A/C system. So this is what I did prior to the shop removing the access panel to replace the low pressure switch was…..
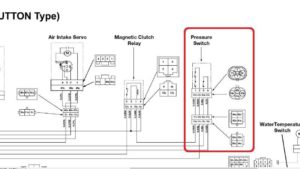 I searched and found the wiring diagram for the A/C system
 I removed the access panel and found that the last person (the carpet installers at Caledonia RV) had stripped the heads off the screws in the backer frame and I had to break that frame to get it out. I then rebuilt it before putting it back with all new screws

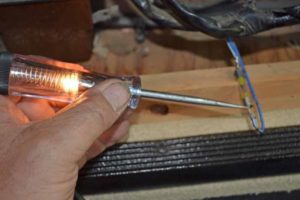 I tested the fuse located in back of the panel and found it to be good. I then jumped the low pressure switch in the A/C system and found that the A/C compressor fired up and the electric fan over the evaporator ran. At this point, I figured the system was low on Freon and I needed a shop with a manifold to look at the system
So when I got the unit back, I discovered that the entry handle was loose. The whole access panel moved around, this also was show to the service writer and mechanic before leaving the shop. Once I got it home and started to look into the problem I noticed …..
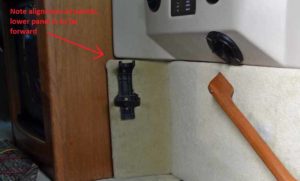 The alignment of the panels, because the side panel was not screwed in in the correct location the screws went all the way through the backer and into the TV cabinet. It also caused the right side not to be fully engaged on the right side allowing the handle backer to move around as demonstrated when picked up.
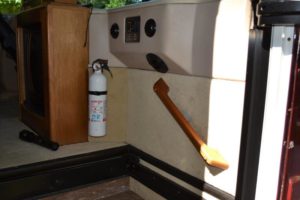
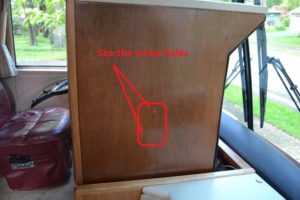
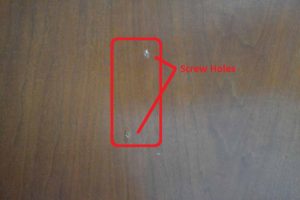
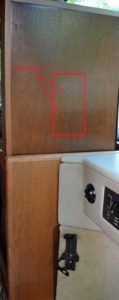 With the screws which hold the fire extinguisher and side panel not screwed into the correct location, they went through to the TV cabinet. With the panels lined up, the screws do not reach the TV cabinet.
With the panel pushed back up against the backer frame and the panel lined up with the dashboard edge the entry handle is once again solid and can be used to get up the steps into the coach.
 Inside I found a relay not fastened.
Just a couple of seconds to slide it onto its stand and clip the wires into their correct location.
A small thing but it speaks to pride in workmanship
The original reason the coach was brought to the shop was an air leak that I was experiencing. Over a period of 24 hours, the air tanks would completely drain. In the first hour it would lose 30 PSI. The leak was found to be coming from one of the low air pressure sensors and they replaced it.
The original sensors were single terminal and grounded through the pipe fittings. The new sensor had two terminals on it, one for a ground and one for the signal for the low air pressure in the system. Once the low air pressure was sensed, the sensor would ground the signal and cause the light to come on and the buzzer to sound.
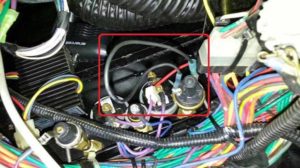
I pulled the kick board to see if I could find the cause of the turn signals not working (remember the beginning of this discussion that this is the reason the Motor Home is back in the shop now), and this is what I found:
First, the ground wire was not connected. On closer examination, I discovered that the new sensor was not even wired into the system. I guess they could not figure out the purpose of the second terminal.
With the sensor wired this way, the alarm would never have sounded!
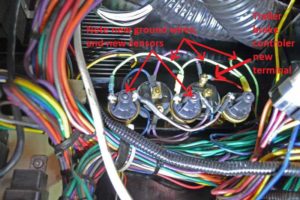
 When I had the trailer brake control installed by Conway Volvo and Bus, they used a 3M wire splice to connect the controller to the brake lights.
So…I re-did the whole thing. I added two more new sensors so that they are now all the same.
The new sensors are two terminal and require a separate ground. So I ran a ground for all three sensors, removed the 3M splice and added a terminal end.
Motor Home is back in the shop right now. They have promised to get the turn signals restored quickly. I just had no choice as there are other things I must do on the dragster to be ready for the race.
 Sorry for the quality of the pictures, but this is a tight area and most of the work was done left handed.
The sensors are now all two terminal sensors and require a ground wire to function correctly
 The low air pressure alarm and warning light come on at a pressure below 60 PSI.
Parking brake indicator also lights up.
 Above 60 PSI, the warning light and buzzer goes off as they should.
So that is the latest tale of woe about repair shops. Currently the turn signals still do not work and I will not drive it like that to our last race of the season down in Bowling Green KY.
They say they will get it corrected in time. Other electrical problems noted are the mirrors do not respond to movement commands and the driver’s window does not go up and down. These functions are all in one panel and there seems to be no power to the panel.
I heard from the repair shop this evening at 4:00. The problem has been located and fixed.
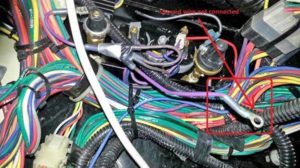
One wire had been pulled out of the relay on the end of the circuit breaker panel. It was the yellow wire and supplied power to the turn signals, power window, mirror movements, and the backup monitor.
In order to repair the pulled wire, the breaker panel had to be removed. A very tight fit as I have looked in this area myself.
Below are the pictures sent from the shop to show the location of this problem.
Looks like I’m going racing next week!
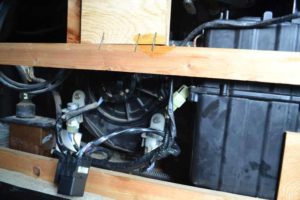
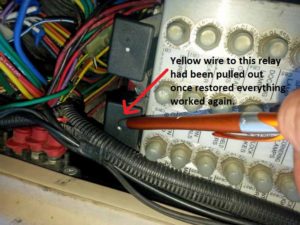 This is from the top looking down in back of the dash board.
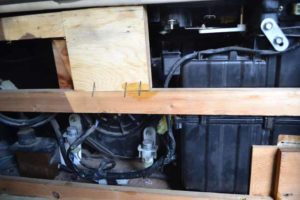
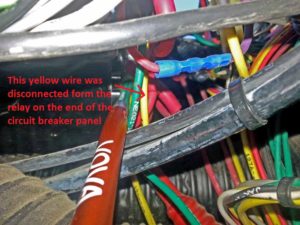 This is looking up from underneath.