
Trailer Jack Knife Damage 2017 10 20
Click picture to see larger image
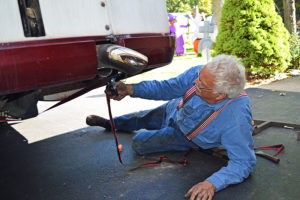
I had an unfortunate incident this past weekend. Even though I had a spotter while backing up, I jackknifed the trailer into the motor home.
Driver is always responsible for the operation of the vehicle. The mistake I made was to only check the mirror my spotter was in.
As a past trucker who takes great pride in my driving abilities, the incident was very embarrassing, and yes it was in front of a bunch of people that know me. I used to train tractor trailer drivers. I cannot tell you how many times I told students, if you are in doubt stop, get out and look. This simple action would have saved me three days of work and the motor home will never be the same.
Note the corner that got damaged had been hit before by a previous owner and the repair that was done was not very good. Gaps were wrong, the right rear compartment door only latched with one of the two latches.
Below is the story on my attempt to repair as much of the damage as I can.
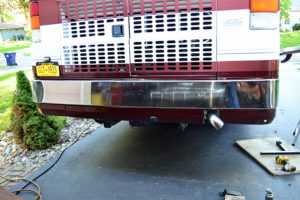
So let’s take a look at the damage to the motor Home. The damage to the trailer will be taken care of after the motor home is winterized. The big projects left are the fluid changes, filters, and, oh yes, resealing the roof.
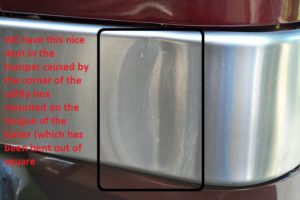
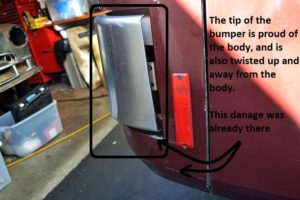
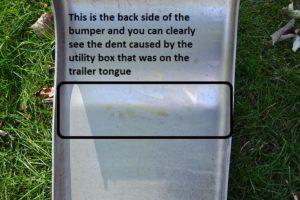
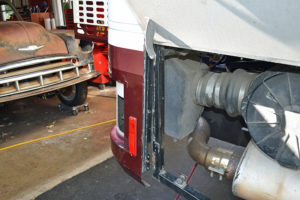
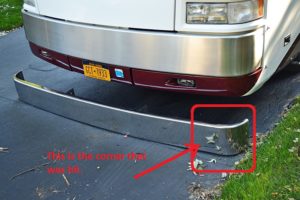
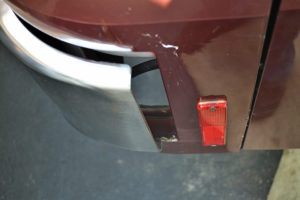
The corner of the utility box that is mounted on the trailer tongue hit the bumper squarely. It put a nice bend in the bumper and caused the tip of the bumper to be pushed out from the body.
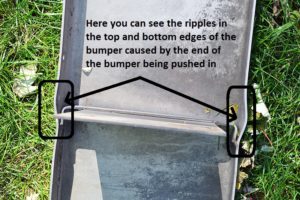
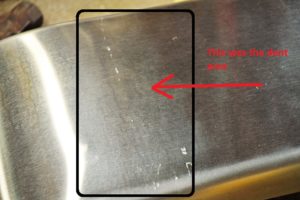
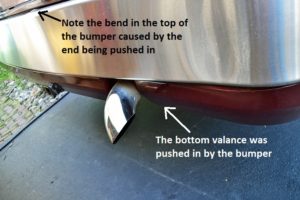 The valance the runs under the bumper is no longer straight. The piece between the tail pipe and the outside right rear edge has been pushed in by the bumper. There are also creases on the top and bottom edges of the bumper (the bottom edge is not visible in this picture).
So one of the big things is shown in the pictures below. Embedded between the layers of body fiberglass is a piece of metal used to tie the fiberglass body to the metal frame of the motor home. When the body was flexed the metal remained in place and the fiberglass separated. The metal was bent and is now holding the fiberglass body proud of the right rear compartment door. It is fortunate that this is not a sealed compartment. It is just an access door to the muffler, air cleaner and the air drier.

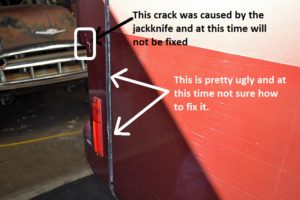
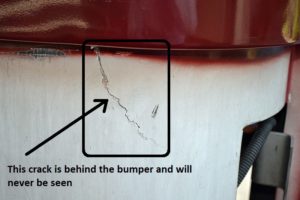
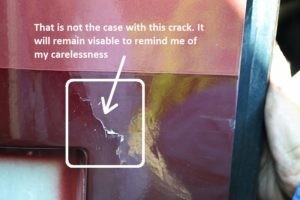
The fiberglass body also took some damage and I will not be repairing it at this time. Winter is coming and I just will not have time. There is one crack that is in back of the bumper and will never show There is another crack above the upper corner of the bumper.
The bumper removal was actually quite simple. There were only eight bolts that hold it to the motor home but an additional four bolts had to be loosened to line the bumper back up as much as possible.
So now let’s talk a little bit about the damage to the bumper itself. We have the dent that the utility box made to the bumper, and the end of the bumper was also pushed into the motor home. This caused the bumper to bend at the bumper brace. These bumpers are not as strong as you would think. All this damage was done by a cheap aluminum diamond plate utility box bolted to the tongue of the trailer. I will address the repair of that in a different project and it might not be until spring, we are really pushing the weather envelope here.
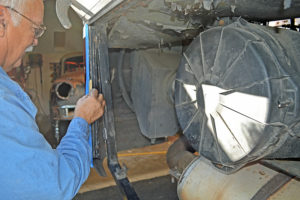
The body was sprung out and it became worse when the bumper end bracket was removed. I used a ratchet strap to pull the body frame member in until the body panel lined up with the compartment door.
Unfortunately I did not take a picture of the body panel sprung out.
In these pictures it looks like I have pulled the frame too far in; however, when the body panel is attached to the frame, the edges of the front and rear door panel line up.
 So now we are really into the repairs. The next problem to address is the separation of the fiberglass body from the metal flange embedded in it. What I did was fill the gap with epoxy. I used a small tongue depressor to shove the epoxy all the way into the gap and completely fill it.
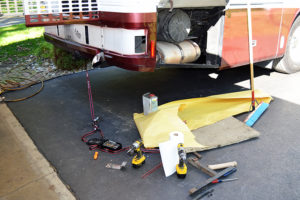 Once again, I am amazed at how many things accumulate as a project progresses.
Speaking of progressing, it is time to start working on the bumper. Although it is not particularly strong, it is stronger than body panels (not that I am a body man at all!) so it presented some interesting problems
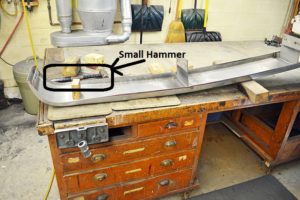
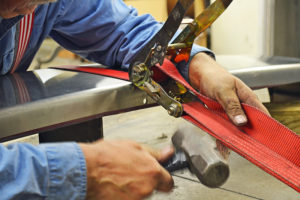
I propped up the bumper so that the side with the bend in it was sitting flat on the work bench. I then took a block of wood and a small hammer and persuaded the dent back out. It did almost come all the way out, the top still shows signs of the past mistreatment and with heat I could have gotten it out, but was not sure what it would have done to the color of the stainless steel, so I left it as a reminder of my carelessness.
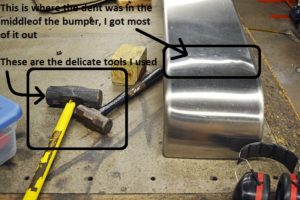 Some more delicate tools to work the kinks out of the bumper.
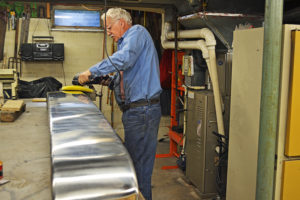
Trying to get the kinks out of the top and bottom edges of the bumper took some creative thinking. I turned the bumper over and used a car strap to go across the bumper and around the work bench. This put downward force on the bumper. Then I hammered on the creases to try and flatten them out. At some point, did I say these bumpers were not strong? I take it back.
I have a friend that has an Eagle and he polished his front and rear bumpers. I have always liked the look and wanted to try it. I started with a regular car buffer (the black one shown) and quickly realized it was going to take MORE POWER (I’m now channeling Tim, the Tool Man, Taylor) so I broke out my six inch grinder and mounted the buffing pad on it and went to town. In 25 minutes this is what I had.
I now wish I had spent more time as I could have gotten it shinier but I was pressed for time. I have a roof coating project that must get done and a small window of GOOD weather. We are currently running 15 to 20 degrees warmer than we should be in October and reality will set in early next week. There are some other housekeeping projects that will have to be done in the bad weather (cold).
The rear bumper (polished) is set on the ground under the front bumper (represents what the rear one looked like before I started).
The corner closest to the camera is the right rear corner when it is on the back of the coach and is the corner I hit.
I think I got it pretty straight (and also shiny).
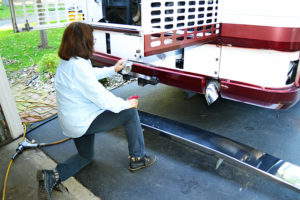 The better half was a great help on this project, and on the upcoming roof sealing project. The project would not have gotten completed in the time frame that was available without her, I love her dearly. I do not know how she puts up with some of the crap I pull.
I should have painted the area in back of the bumper black as this white has always shown around the edges and does not look very good. I will probably tape the bumper and body off and spray what can be seen.
I could not put these brackets back in this condition so a little sand blasting and a little powder coat and they are looking much better. Time to mount them back to the frame.

 I mounted the bumper back on the Motor Home and the damaged end now sticks way out from the Motor Home. I believe it was the delicate tweaking I did to the bumper to remove the bend and creases.
Off it comes again for some additional messaging.
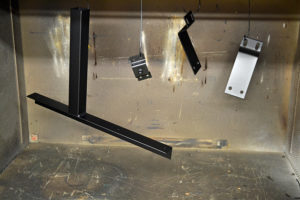
What I needed to do was bend in the damaged end without changing the shape of the other end.
I traced the outline of the edge of the bumper on the bench top and used that to tell when I had the damaged end bent in enough. I was not able to get it to come all the way back.
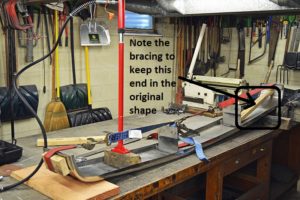
I braced the good end so that it would not move.
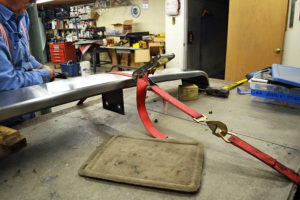
I used a Porta Power up against the main support beam of the house to push down on the bumper and a car strap to pull in on the edge of the bumper. These car straps are certainly getting a workout today.
The Porta Power was a new harbor freight purchase (I really dislike buying foreign stuff. I also believe in buying quality which harbor freight does not have. I really had no choice here), I did break it doing this (the pump would no longer pump) so I took it back and got another one. It was on sale and I had a 20% off coupon and this was the total expense of the repair so, other than lost time, it did not turn out to be too expensive of a repair.
When I was pumping it up, I could hear the floor creaking so I was putting a fair amount of pressure on the bumper.

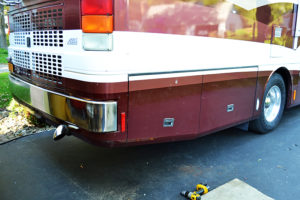
So, it is nowhere near perfect. It is actually a little better that it was before the little incident. Remember this corner was hit by a previous owner and the rear compartment door had wide gaps and was very hard to latch.
The bumper is pretty straight and is shiny (I will have to come back and hit it again with a buffer to get more shine and to remove the scratches I induced with the second round of tweaking, and then do the front bumper).
The compartment door seams are even. The door is flush and latches firmly.
This is the best I can do with the time constraint I have. The Motor Home still needs some additional winterization (Water has been drained, I want to run some antifreeze through the system).
Now we have to get the trailer over here to fix the utility box. I am really surprised that a cheap flimsy aluminum utility box could have caused all this damage. There certainly is something to be said for structural strength (the box was hit on its corner). Time to go clean up the mess left over from this project and start the next one.